Getting Started with Makeblock Robotics V3
Created by Andreas Kaiser (akaiser.bhs@gmail.com) from Benicia High School in Benicia, California
Inventory
- Get your makeblock starter kit and make sure it has all the needed parts
- Parts list can be found HERE
Tankbot Assembly
- Use the instruction manual to build the tankbot (NOTE: do not use the plastic rivets to attach the Orion board to the bot. Use screws.)
- If you are using the Auriga Controller:
- Add 4 plastic rings at the end of the Beam 0824-144 at the front of the robot, this is so the encoder motors fit.
- Add a Beam 0824-128 to fit the USB cord into the Auriga Board when connecting to the computer.
- Adjust acrylic brackets to fit along the beam in the middle of the robot.
- Insert USB Battery or 6 fully charged AA batteries that are all the same brand
- Connect USB Battery pack to the Auriga Board and turn on power to the board.
- If you have a rechargeable phone pack attach it with zip ties, loose enough to wiggle the pack out but tight enough it will not slide out when the bot is driving.
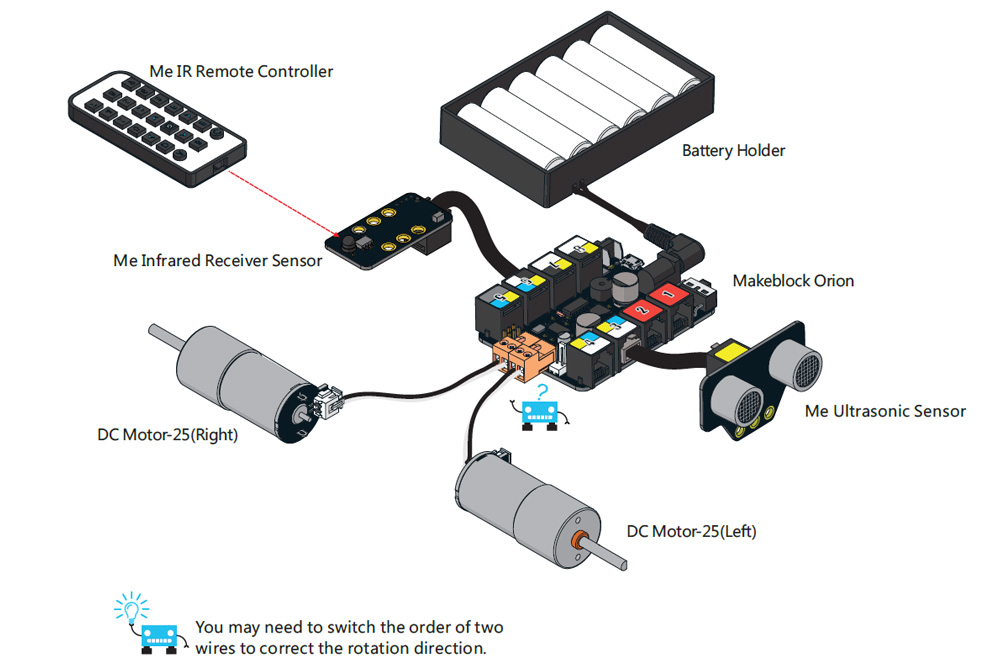
Remote Control (RC) with the Infrared (IR) Remote (Orion ONLY)
- Student computers in the lab already have all the needed software, but if you are at home, make sure you install the latest Arduino IDE, Makeblock Arduino Library, and Makeblock software and drivers. Instructions for installing Arduino makeblock library.
- Connect USB cord from Orion controller to your computer
- Wait for the drivers to install (see bottom right hand corner of your desktop)
- Make sure your Orion board is powered off (switch is next to power port on Orion)
- Open up Arduino IDE (desktop icon is shown to the right)
- Go to Tools Menu, select Board and make sure you have UNO selected
- Go to Tools Menu, select Port, and choose the last COM port in the list
- Go to File Menu -> Examples -> MakeBlockDrive -> FirmwareForStarter -> Starter_factory_firmware
- If you do not have makeblock drive examples, see 3.1 above


- Click the upload button (right arrow next to check in upper left of Arduino IDE)
- Wait until the firmware has successfully uploaded and then disconnect USB
- If it did not upload, see 4.x below
- Place bot on the ground & turn power on
- Use IR remote to drive robot (see controls below)

Troubleshooting upload to Orion
- Check if everything is plugged in correctly. ONLY use long usb cord (not little white cord or special USB to power cord) and make sure USB connects to Orion (not battery!!!)
- Confirm you have the correct com port selected (by disconnecting the USB and seeing which port disappears)
- Plug into a different USB port on your computer
- Try restarting Arduino, mblock, or your computer.
- Try using someone else’s usb cable.
- Try using a new computer.
- Try seeing if your code will download into someone else’s robot.
- Try using a new board.
How to Reinstall Orion Bootloader
- Follow the troubleshooting guides below: https://forum.makeblock.com/t/how-to-fix-if-me-orion-didnt-respond-updated-on-3-16-2017/952
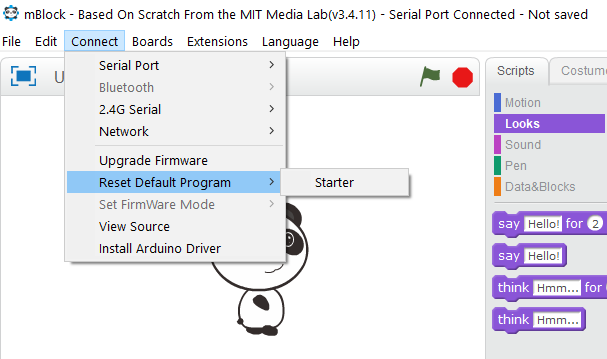
- Open mblock and reset the default program. Then upgrade the firmware.
- After that, reupload the starter firmware from Arduino IDE and test it with the motors.
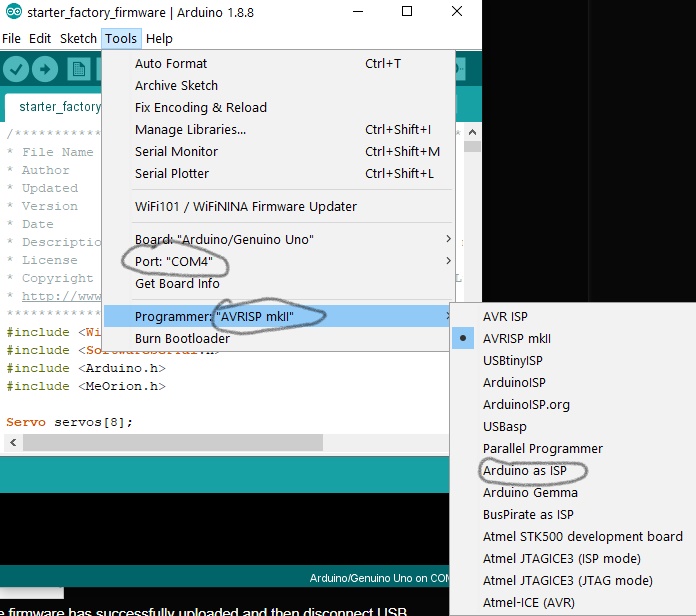
- Possible issues: Make sure the programmer is set to "AVRISP mkII" when uploading sketches and "Arduino as ISP" when burning the bootloader; Make sure the port is set; Don't have Arduino IDE and mBlock open at the same time.
- Now you should be able to upload new programs to your Orion.
Troubleshooting upload to Auriga
- (David to complete) - Mega2560
Remote Control (RC) with the Infrared (IR) Remote (Auriga ONLY)
- Set board to mBot Ranger(Auriga)
- Make sure to set the infrared receiver port to what you have it plugged into
- Set board in Arduino to Mega2560
Remote Control (Bluetooth) with phone app (Auriga ONLY)
- Install the Bluetooth module
- Use a flathead screwdriver to unclip four clips on the bottom of the Auriga board and remove the cover.
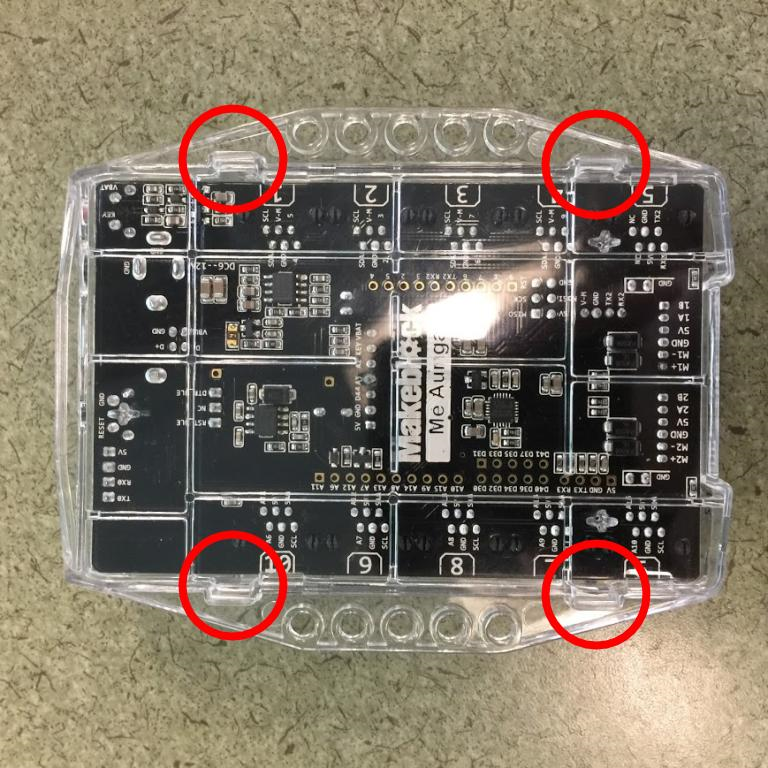
- Place the Bluetooth module on the board in the spot indicated below
- Replace the cover

- Download the Makeblock app (It should be called ‘Makeblock’ and look like the icon below)

- Choose ‘mBot Ranger’ when it asks what your robot is
- Use the ‘Create’ option to build custom code into your robot
- Troubleshooting: Bluetooth starts connecting but Synchronization fails
- Download Makeblock5 on your computer
- Go to devices, add, and choose mBot Ranger
- Plug in the robot to the computer and connect it
- Click the settings button
- Click ‘update firmware’ and choose ‘Online Firmware(09.01.017), it should be the only option
- Click the update button and unplug your robot
Troubleshooting the TankBot or 3-wheeled bot
- Robot drives slow
- Press “9” on remote to set the bot to full
- Nothing moves when you press the forward button on remote
- Is the firmware installed (see above)?
- Is the Ir receiver plugged into Orion port 6?
- Is the Ir receiver LED facing up?
- Are batteries installed on the bot?
- Is the power switch on?
- If you press the remote button and nothing lights up on IR receiver board, the remote may have a dead battery
- When you press forward and the bot goes backward
- Both sets of motor wires need to be reversed (see 4.4 instructions below)
- When you press forward and 1 tread goes forward and the other backward
- Locate the motor wires leading to the motor going backward
- Unplug the terminal block of that motor wire from the Orion
- Unscrew the 2 terminal block screws just enough to remove the black and white motor wires. Make sure to only loosen the screws a bit. Do NOT fully remove the screws!
- If the code is all correct, and there is a problem uploading it, first make sure the COM ports are the same on both mBlock and Arduino. Then, if it still doesn’t work, you need to go to mBlock, and above the Arduino code plane, click Upload to Arduino. After that, even though it may say upload failed, go to Arduino again and upload from there.

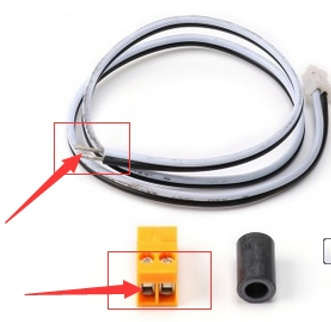
- Switch the black and white motor wires (to reverse motor polarity) and plug them back into the terminal block. Screw to tighten wires and reinsert into Orion board.
- When you press right and the bot goes left
- Unplug both motor terminal blocks from Orion
- Reverse blocks and reinsert into Orion
3-Wheeled Robot Assembly
- Use the instruction manual to build the 3-wheeled robot
- Remember: you many need to reverse some of the motor wires (see troubleshooting above)
Configuring the Bot for User Programming with MBlock
- Turn the Orion’s buzzer OFF (see below)

- Install Mblock Firmware using Arduino
- Start arduino IDE and go to file menu and then select examples
- Open makeblockdrive
- Select firmware_for_mblock then starter_factory_firmware at top
- NOTE that these are two different codes. Use starter_factory_firmware if you are coding for the remote. Firmware_for_mblock is used to code your robot to drive autonomously.
- Under firmware_for_mblock and choose Orion_firmware to open up firmware code.
- Go to Tools Menu, select Board and make sure you have UNO selected
- Go to Tools Menu, select Port, and choose the last COM port in the list
- Upload your code using the right arrow at the top of screen
- Now you can use mblock to code your robot

- Configure Mblock software
- Open Mblock software (desktop icon shown on the right)
- Make sure to connect your bot to the computer with USB cable
- Set board to Starter/Ultimate (Orion) in Boards menu
- In Extensions menu make sure Makeblock is selected
- In Edit menu, select arduino mode
- You will now have the arduino code visible in the right view pane
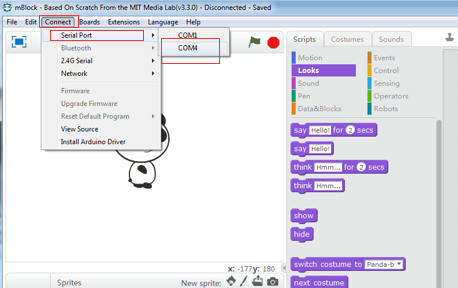
- In Connect menu select Serial Port and choose the last com port listed (see below)
- Then choose the Upgrade Firmware by going to Connect menu and then Upgrade Firmware, then Close when it shows Upload Finished. (see below)

Hello World: Your first program in Mblock using the Orion
- Complete above steps for configuring the bot for use with Mblock
- On the left Scripts pane, select the robots button to bring up the Orion script blocks
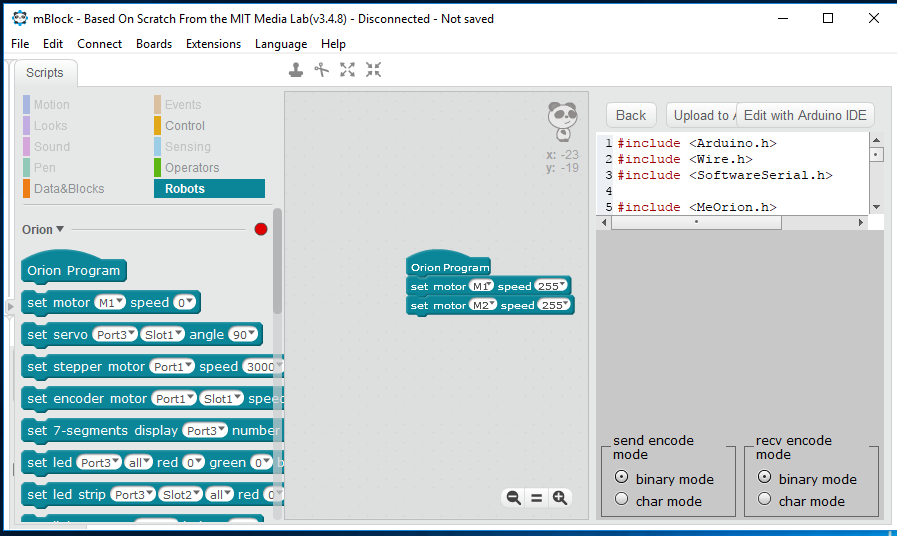
- Click and drag the Orion Program starter block to the middle workspace pane
- Click and drag the set motor block to the middle workspace pane and attach it to the bottom of the starter block
- Attach another set motor block underneath the first one and change the motor to M2
- Set the speed of M1 and M2 both to 255 (full speed)
- Make sure your Robot is connected by USB- BUT TURN BOT POWER OFF
- Press the Upload to Arduino button in the top right to load the program into your robot
- Your Robot will start driving as soon as you disconnect the USB and turn power on
- If the upload fails, copy the arduino text code in the arduino pane into the arduino IDE to upload directly from Arduino (make sure you set the board and com ports correctly in the menus)
- Try adding delay blocks to have your robot go forward and then stop
- Try turning your robot to the left or right by modifying the power to one of the motors
- If the code is all correct, and there is a problem uploading it, first make sure the COM ports are the same on both mBlock and Arduino. Then, if it still doesn’t work, you need to go to mBlock, and above the Arduino code plane, click Upload to Arduino. After that, even though it may say upload failed, go to Arduino again and upload from there.
- If uploading to Arduino works but uploading to Orion fails, delete the code you have currently listed in that pane. Then repaste it onto the blank pane.
Hello World: Your first program in Mblock (using Auriga)
- Disconnect your robot from power and plug it into your computer using a USB Type B cable.
- Open mBlock, and under Boards, select mBot Ranger (Auriga). After that go to Extensions and select Makeblock, then under Edit click on Arduino Mode.
- On the left Scripts pane, select the robots button to bring up the Auriga script blocks
- Once this is done, go to Connect and click Upgrade Firmware. While still in Connect, go under Serial Ports. Select the lowest Com Port you can find.
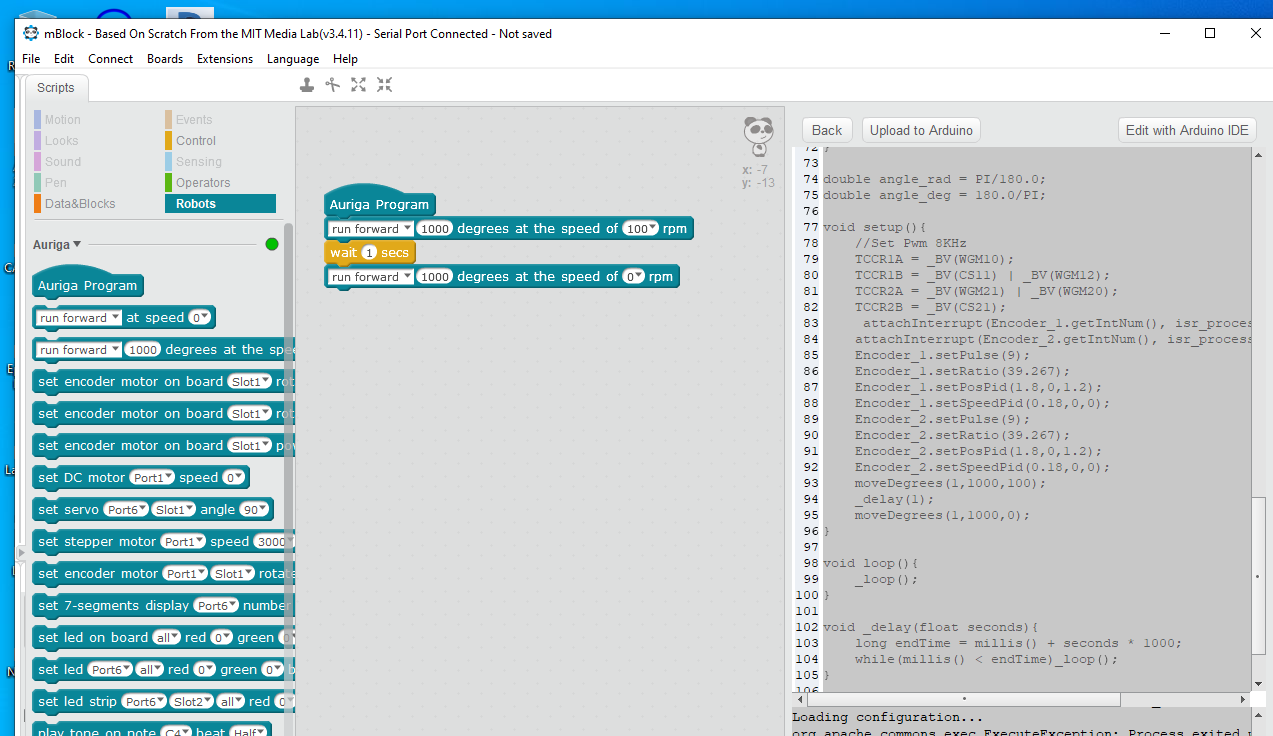
- Given that the Auriga Board is in accordance with the encoder motors, the motor speed determined in terms of rpm.
- If you are unable to drag and drop the block, make sure you have the latest version of mBlock. You can download the latest version here. If that doesn’t work try restarting your computer.
- Click and drag the Auriga Program starter block (which is under Robots in Script) to the middle workspace pane, next click and drop run forward 1000 degrees at the speed of 100 rpm, wait 1 seconds, and a run forward 1000 degrees at the speed of 0 rpm block to finish the program
- When done programming, copy the arduino text code in the arduino pane into the arduino IDE to upload directly from Arduino. Before you click upload head to Tools in the Arduino Menu Bar, and select the Board called “Arduino/Genuino Mega or Mega 2560” along with that, make sure the com port under the Board selection is the same as the com port you selected in mBlock.
- After that, upload your code using the arrow icon under the Arduino Menu Bar.
- If the code is all correct, and there is a problem uploading it, first make sure the COM ports are the same on both mBlock and Arduino. Then, if it still doesn’t work, you need to go to mBlock, and above the Arduino code plane, click Upload to Arduino. After that, even though it may say upload failed, go to Arduino again and upload from there.
Using Servos (including Claw and Pan & Tilt)
- Servo motors can rotate from 0 to 180 degrees.
- Servos must be wired to a RJ25 adapter card. The servo can be connected to either slot. However, there can only be 1 servo per RJ25 card. See image below.

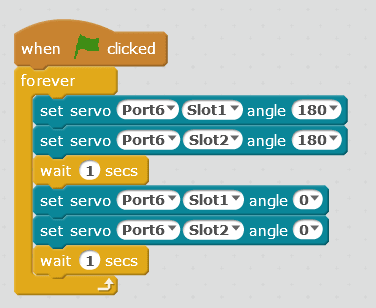
- Code the servo with the set servo command using the correct port and slot. See code above.
- NEVER manually turn the servo while it is powered. This can destroy the servo motor.
Limit Switch
- Limit switches must be wired to a RJ25 adapter card. You can use either slot, but only use the outside of the the 3 wire pins (not the middle pin). See image below.
- The limit switch code block returns a boolean value (true or false) and should be used in conditional statements like If/Then and repeat/until. See code example above.


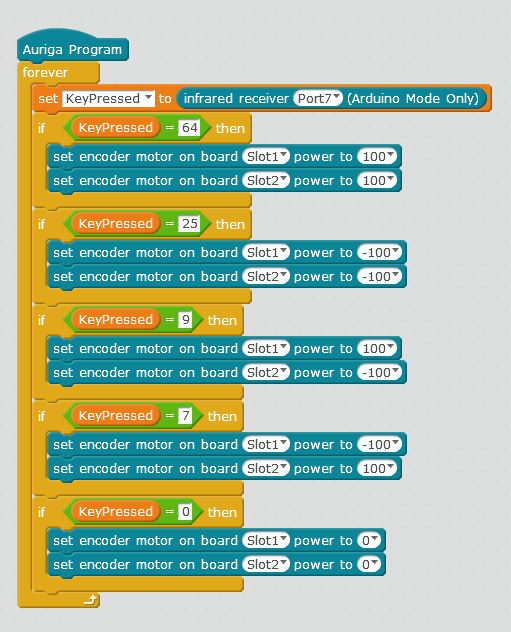
Coding IR Remote Commands with MBlock
- You can code custom commands with the IR remote using the example below and the chart showing the value that each button will return
- Make sure to create the KeyPressed variable in the data scripts blocks menu first
- You can modify this example and add code for moving the claw or other servos


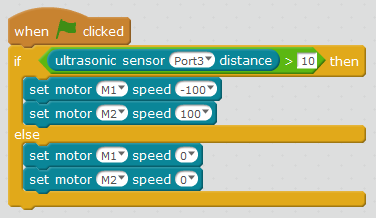
Using the Ultrasonic Sensor
- Connect the Ultrasonic sensor to Port 3,4,6,7 or 8
- The ultrasonic sensor is an analog sensor that returns the distance to an object in front of it.
- It cannot see objects too close (<4cm) or too far
- Use the code example below or watch this video for more help on coding the sensor
- If you do not have the 7-segment display, use the serial output to view what value the ultrasonic sensor returns (see serial monitor output instructions below)

Using the Potentiometer
- Connect the potentiometer into Port 6,7, or 8
- The Potentiometer (i.e., variable resistor) is an analog sensor that will return a value from 0 to 1024 depending on how much the dial is turned
- Code the potentiometer similar to that of the ultrasonic sensor above
- Use the 7 segment display (or serial output) to test the potentiometer

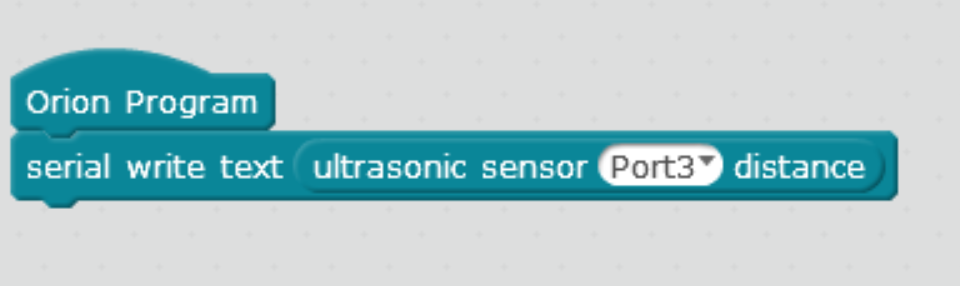
Serial Monitor Output
- While connected to the computer with the USB cable, you can use the arduino serial monitor to see values of sensors and variables. This is a useful testing and troubleshooting tool.
- Mblock can output values through the scratch “stage” using the say commands
- You can also use the serial monitor on the Arduino IDE to view output. You will need to activate the arduino extension and then use the serial write text block below. See this video for further instructions.
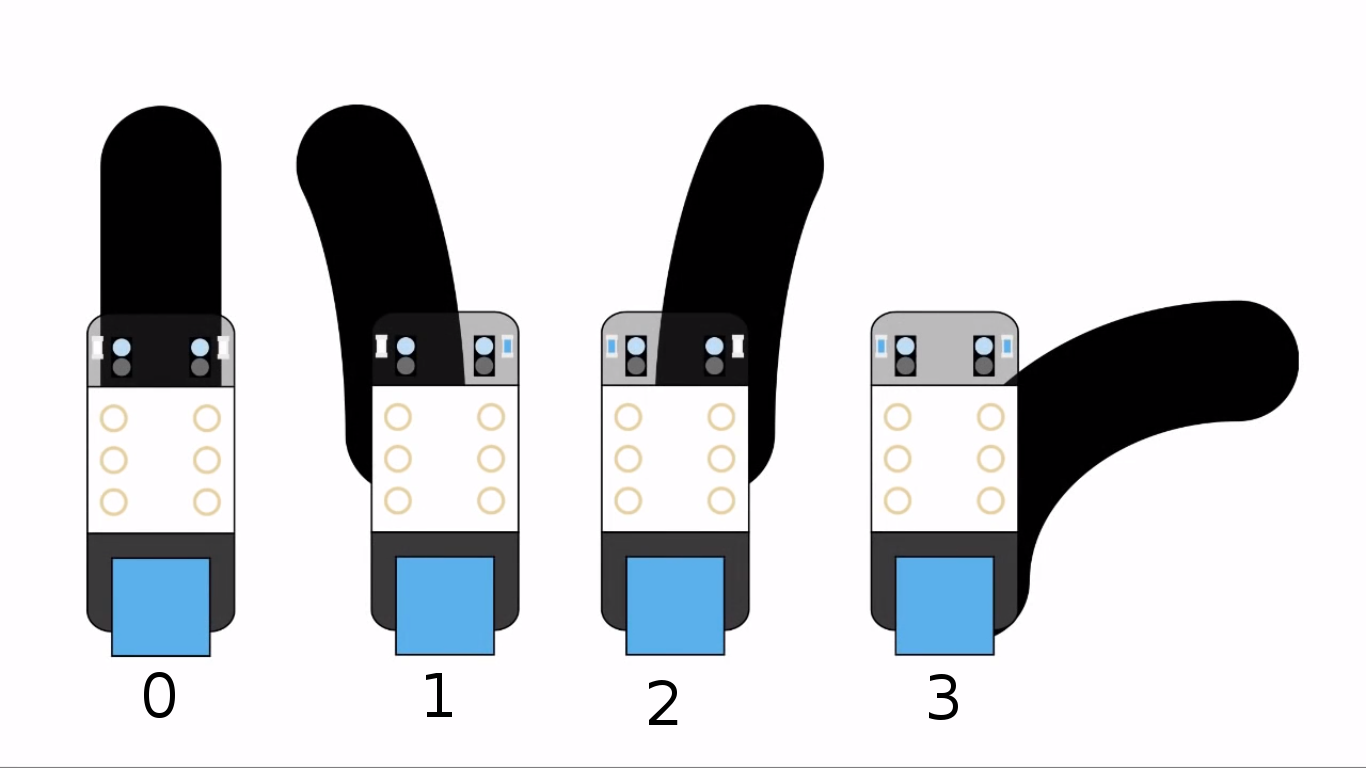
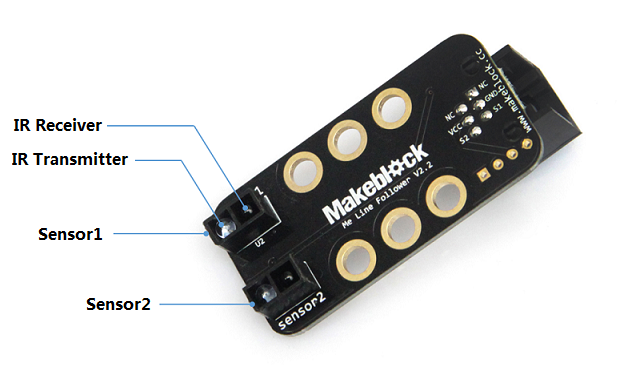
Using the Line Follower
- Mount the line follower close to the ground- but do not touch the ground.
- Connect the line follower to port 3,4, or 6
- The line follower sensor can determine if there is a black line directly below it.
- will return either a 0,1,2, or 3 based on the readings from the two IR sensors (see diagram below)
- For more help, see http://www.mblock.cc/example/value-of-the-line-follower-sensor/ and http://www.mblock.cc/example/primary-line-patroling-program/ (NOTE: the code examples listed are written for the Mbot robot and will need to be modified to work with the Orion controller).
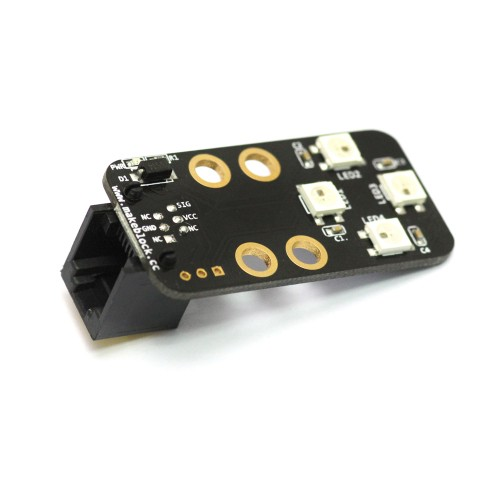
Using the RGB Light
- Connect the RGB LED to port 3,4,6,7, or 8
- Each of the 4 RGB LED lights, can generate thousands of colors from the combination of the Red, Green and Blue colors. The red, green and blue accept integer values for brightness from 0 to 255. This makes 256*256*256=16777216 possible colors.
- Use the code block shown below to set the colors of each (or all) of the LEDs as needed. For more info, see: http://store.makeblock.com/me-rgb-led

Using the 4 Button Switch
- Connect the switch to port 6,7, or 8.
- The code block shown below will return TRUE if the button is pressed or FALSE otherwise
- For more info see: http://learn.makeblock.com/en/me-4-button/

